Workspace Settings
Workspace Settings is where Workspace Owners and Admins configure how the whole workspace looks, behaves, and spends. It's a single page with a row of tabs at the top.
Accessible to: Workspace Owners and Admins (most tabs); Trainers (Tags and Branding Intro tabs).
Opening Workspace Settings
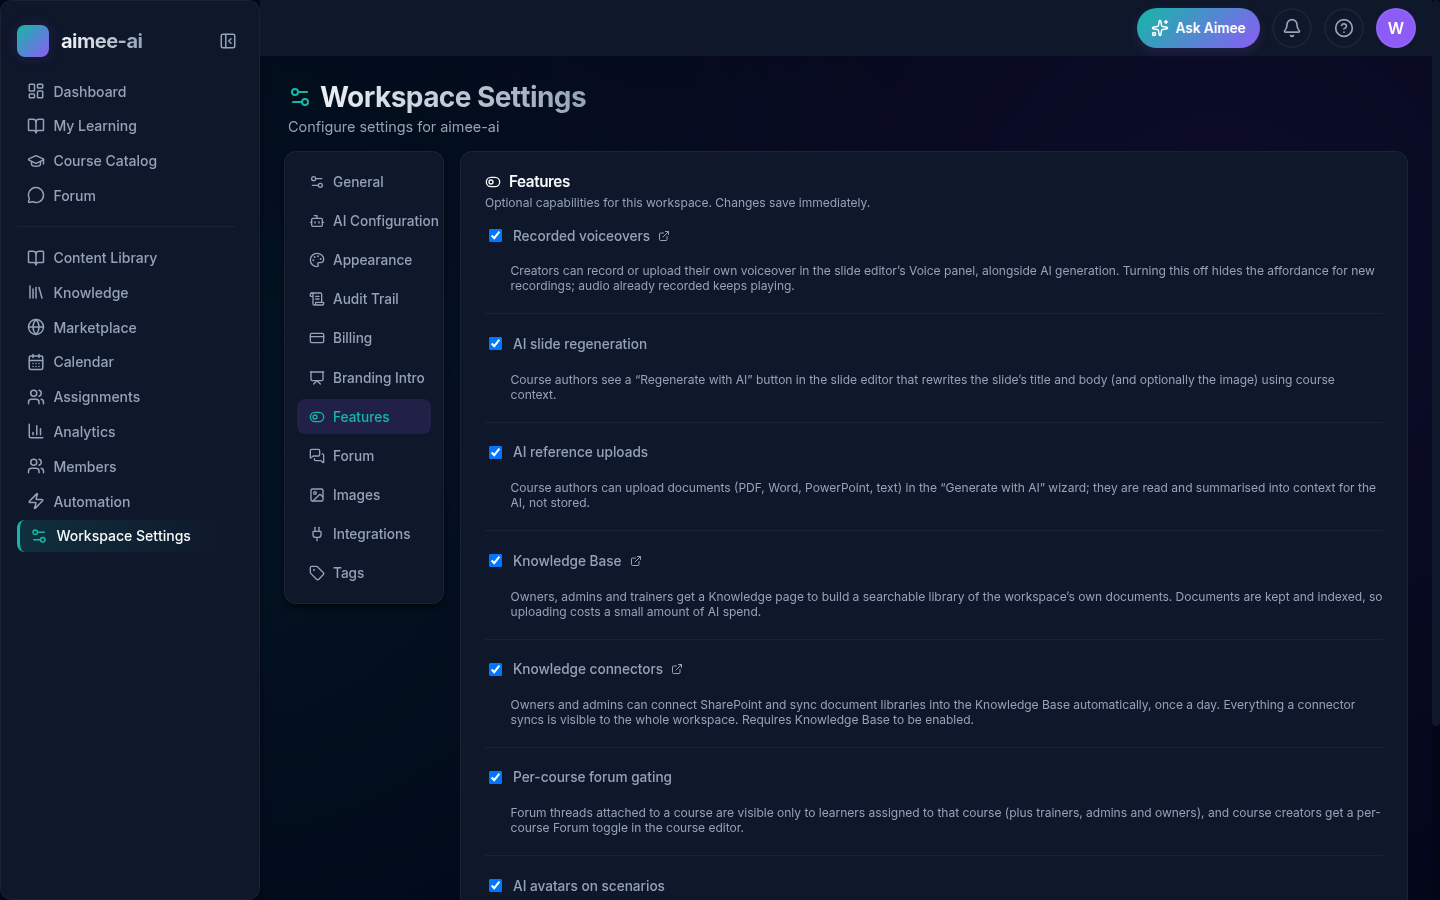
Navigate to Workspace Settings in the sidebar. General is pinned as the first tab; the remaining tabs are listed alphabetically: AI Configuration, Announcements, Appearance, Audit Trail, Billing, Branding Intro, Features, Forum, Integrations, Media, Tags.
The Forum tab only appears once the workspace has the in-workspace forum turned on, and the Branding Intro tab only appears once Branding Intro is enabled. The Announcements tab is visible to Workspace Owners only - Admins do not see it. Everything else is always present.
Trainers who open this page see only the Tags and Branding Intro tabs - every other tab is hidden for that role.
Looking for AI cost?
AI spend has its own home now. Open Analytics in the sidebar and switch to the AI Cost section. The breakdown is only visible to Workspace Owners.
General
Workspace-wide identity and retention settings.
| Setting | What it does |
|---|---|
| Company / Workspace Name | The name shown on invitations, emails, and across the app. |
| Default pass mark (%) | The pass mark that each new course starts with. This includes an imported course and a course that AI makes. You can change the pass mark of one course in its settings. The default is 70. |
| Trash retention (days) | How long a trashed course stays restorable before it is permanently deleted. Restoring a course cancels the countdown. |
| Custom Workspace Logo | Upload a PNG, JPG, or SVG (up to 2MB; 256×256 recommended) to replace the default logo. |
| Course time rules | The low and high time in seconds for each block type. The course editor uses them to estimate the time of a course. A course can override a rule. Click Save rules to save them. This section has its own button and does not use Save Changes. See Estimated course time. |
Click Save Changes in the page header to persist any edits - the button only appears when you have unsaved changes.
AI Configuration
Sets the voice Aimee uses when generating narration across this workspace, and how large an AI-generated course is allowed to be.
- Voiceover Languages - the languages trainers can generate per-slide voiceovers in. English is always available.
- Agent Voice Persona - pick from the available voice personas. Trainers can still override per course or per block.
- Accent / Locale - anchors the English accent used for every generated voice-over. Choose Neutral to let the model pick.
- Default Avatar Character - shown once AI avatars on roleplays is enabled on the Features tab. Sets the character used wherever a roleplay shows a character tile.
The on/off switches that used to live here (recorded voiceovers, the Knowledge Base, and others) have moved to the Features tab.
Course Generation
A Course Generation panel sets how many main slides the AI wizard may target when it designs a course for you. Fill in Minimum slides and Maximum slides; the panel states the range the system permits, and a workspace can narrow that range but never widen it. Trainers then see your range as the slider bounds on the wizard's slide-count step, so nobody can ask for a course larger than you allow.
Above roughly 35 slides Aimee builds the course in batches rather than in one pass. When that happens the outline review step is always shown, even if the trainer didn't ask for it, and it tells them how many batches the run will take before they approve it. Courses at or below that size are generated exactly as before.
Note
Setting the minimum higher than the maximum is rejected. The panel flags it as you type, and if you save anyway the change is refused and the previous values stay in place.
Announcements
Compose notices for the people in your workspace - a new feature, a schedule change, anything worth surfacing. Visible only to Workspace Owners.
An announcement reaches its audience the same way a platform-wide notice does: a banner across the top of the page and an entry in the notification bell. See Service announcements for how that looks to the people receiving it.
- Title, message, and severity - the same fields as a platform-wide announcement. Severity (Info, Warning, Critical) sets the banner's colour.
- Audience - choose Everyone in this workspace, or narrow it to one or more roles (Admin, Trainer, Reviewer, Learner).
- Starts / Ends - leave both blank to publish immediately with no end date, or schedule a window.
- Link - an optional internal page or an external link your global admin has allowlisted.
Announcements you've published are listed below the form with their audience, severity, and current state (Live, Scheduled, or Revoked). Click Edit to change one, or Revoke to pull it early - a revoked announcement stops appearing immediately, but people who already dismissed the banner or read the bell entry keep that state.
Appearance
How the app looks for everyone in the workspace.
Course colours
Set the colours that the slides of every course in your workspace use. There are 6 colours:
| Colour | Where it shows |
|---|---|
| Primary | Headings, buttons and main boxes |
| Secondary | A second box colour |
| Accent | Highlights |
| Warning | Cautions and hazards only |
| Surface | The slide background |
| Text | The body text |
| Correct answers | Optional. Correct answers and ticks. When you set it, a quiz shows each answer result as a solid fill |
| Activity background | Optional. The background of quiz slides and key message cards |
Pick each colour, or type its hex value (for example #0E4D57). A preview shows how a slide looks. Click Save colours to apply them, or Remove colours to go back to the app theme.
- The colours change the course slides only. The menus and pages of the app keep your interface theme.
- A course can set its own colours in its Settings tab. See Course colours.
- When Aimee writes slides or makes images with AI, it uses these colours.
- When a colour is too light for white text, the slides put the text colour on it. So a light amber box keeps its exact colour.
- The 2 optional colours can stay empty. Then correct answers stay green, and quiz slides use the surface colour.
- Incorrect answers show in the Warning colour.
- Slides that use course colours show cards with no line on the left edge, and section slides show no accent line.
Course Display
- "New" Course Badge Duration - courses created within this many days show a New badge in the catalog.
Interface Theme
A grid of theme cards. Click a theme to preview it live across the app - the workspace doesn't change yet, just your view. A banner appears reading "Previewing theme name - look around the app to check how it feels". Click Apply Theme to make it the workspace default, or Revert to go back. Leaving the page without applying also reverts.
Course Block Layout
Controls the padding, max-width, and typography used for every content block in the course viewer. Same preview / apply / revert flow as the theme picker - click a layout to preview, then Apply Layout to make it the workspace default.
Audit Trail
A read-only log of recent activity across the workspace - content edits, role changes, publish events, and other admin-relevant actions. Click Load Logs to fetch the most recent 200 entries.
Each row shows when the event happened, the kind of event, who triggered it (resolved to the person's name and email), and a short message describing what happened. Use it to spot-check who made a change before you ask in chat.
The log also shows the changes to each course. To see the changes to one course only, and to search them, open the course and use its Audit tab.
Branding Intro
A leading slide or set of slides that automatically play before every course in the workspace - a company introduction, brand chrome, or expected-tone framing. Set it once here and every course in the workspace picks it up; learners experience it as a seamless part of each course they launch.
Click Edit intro slides to open the intro editor. The first time you open it, the workspace's intro is created empty; add slides the same way you would in any course. Allowed block types: slide, image, video, YouTube, and PDF page. Interactive blocks (quiz, roleplay, matching, acknowledgement, resource) are not available here - the intro is for branding, not for assessing learners.
Each course can opt out individually: open the course in the editor and turn off Include workspace intro slides under Settings. The toggle defaults to on, so new and existing courses pick up the intro automatically.
Edits to the intro propagate the next time a learner launches a course; in-progress sessions keep the intro that was injected at launch.
Billing
Your workspace's subscription plan, usage meters, and invoice history. See Billing & Subscriptions for the full walkthrough.
Features
Every optional workspace capability in one list. Each row is a name, a short description, and a switch; where a feature has its own guide, a link icon beside the name opens it. Changes save immediately - there is no Save button on this tab.
| Feature | What it enables when on |
|---|---|
| Recorded voiceovers | Off by default. The slide editor's Voice Narration panel adds a Record and Upload File option alongside AI-generated narration, for any enabled language. Turning this off only hides the option for new recordings - anything already recorded keeps playing for learners. |
| AI slide regeneration | On by default. Course authors see a Regenerate with AI button in the slide editor that rewrites the slide's title and body using course context. |
| AI reference uploads | On by default. Course authors can upload documents (PDF, Word, PowerPoint, text) in the Generate with AI wizard as context. The files are read and summarised. Where the Knowledge Base is also on, the author can choose to keep them in the knowledge library rather than have them discarded. |
| Knowledge Base | Off by default. Workspace owners, admins, and trainers get a Knowledge entry in the sidebar where they can build a searchable library of the workspace's own documents. Indexing a document uses a small amount of your AI allowance, and the documents count towards your storage allowance, which is why this is opt-in. See Knowledge. |
| Knowledge connectors | Off by default; requires the Knowledge Base. Owners and admins can connect SharePoint and sync document libraries into the Knowledge Base automatically, once a day. See Knowledge. |
| Course health | Off by default; requires grounded generation. Aimee checks once a day whether published courses still cite live Knowledge Base documents, and lists the ones that have drifted - because a document was replaced by a newer version or removed - on a Course health page for owners, admins, and trainers. Learners never see it. See Course health. |
| Per-course forum gating | Off by default. Forum threads attached to a course are visible only to learners assigned to that course, and course creators get a per-course Forum toggle in the course editor. See Forum. |
| AI avatars on roleplays | Off by default. Allows a character tile to appear alongside the voice agent on roleplays that don't define their own role portraits. Pick the workspace default character under AI Configuration. Roleplays that set role portraits show those instead - see Roleplay. |
| Branching scenarios | On by default. Course authors can add a Scenario block: a story where the learner picks a choice and sees what happens next. The Draft the scenario with AI button in the Scenario Editor also needs this switch. Turning it off only stops authors from adding new Scenario blocks - Scenario blocks that already exist keep working for learners. See Scenarios. |
| Stepper blocks | On by default. Course authors can add a Stepper block: a numbered procedure or a dated timeline that the learner reads one step at a time. The Generate steps button in the Stepper editor also needs this switch. Turning it off stops authors from adding or editing Stepper blocks - Stepper blocks that already exist keep working for learners. See Steppers. |
| MCP access | Off by default. Allows AI tools such as Claude to connect to this workspace and act on your behalf - reading your courses, generating new ones, assigning them, and so on. Uses the standard Model Context Protocol (MCP). Enable this only if you or your team are actively using an MCP-capable AI tool. See Integrations below and the API Reference for setup steps. |
A feature that depends on another (for example, connectors depend on the Knowledge Base) shows greyed out until you enable the one it needs.
Forum
The Forum tab is where you administer the workspace's question-and-answer board. Here you can:
- Manage the list of categories threads can be filed under.
- Manage the tag allowlist that limits which tags learners and trainers can apply to threads.
The day-to-day moderation actions (pin, lock, hide a thread or post) live on the Forum surface itself, not here. See Forum for full coverage.
Integrations
Outbound connections to other systems. Each integration is a collapsible panel - click a header to expand it.
Chat Notifications
Send notifications about course completions, failures, and other workspace events to Microsoft Teams, Slack, or any webhook-compatible tool. Set the destination URL, pick which event types to send, and use Send test to verify the wiring before saving.
CRM Webhooks
Send outbound webhooks for CRM-relevant events (a learner signing up, completing a course, etc.) to your CRM platform. Configure the destination URL, include a secret if your CRM verifies signatures, and pick which events trigger a send.
MCP Access
The on/off switch for MCP access lives on the Features tab. Once it is on, agents authenticate with a personal access token (managed here under Access Tokens) and are held to the token owner's role, so only owners and trainers can act. While the feature is off, the connection is refused even with a valid access token. Every tool call is recorded in the Audit Trail tab, and each token is rate-limited so a runaway agent cannot exhaust the workspace.
Media
The images and videos uploaded into this workspace. The tab has three sections:
- Images - every image uploaded into this workspace: course thumbnails, slide images, roleplay backdrops, and AI-generated illustrations. You can search by filename, preview an image full-size, and delete one that is no longer in use. Images that are still referenced by a course are flagged so you don't delete them by accident.
- Videos - the workspace video library. Videos added from a Video block, or from the video button in a slide's rich-text toolbar, are listed here with their size, who uploaded them, and how many slides use them. See Courses for how to place a video inside a slide.
- Trash - images and videos you have deleted. Aimee keeps each item for 30 days and then removes it permanently. During the 30 days, click Restore on a row to put the item back in Images or Videos. Each slide, certificate and background that used the item shows it again. A restored item counts in the storage of the workspace again, so the restore fails if the workspace has no space for it. If Aimee cannot find the file of an item, a message tells you so, and you can delete that item permanently or keep it in the trash. You can delete an image that is still in use: any slide that used it shows a placeholder in its place. You cannot delete a video that a slide still uses until you remove it from each slide. A Workspace Owner or an Admin can delete it anyway, and each slide then shows a Removed video notice. See Courses.
Tags
Tags are how courses are categorised in the catalog and how learners filter for the topics they care about. The Tags tab is the workspace's master list.
From this tab you can:
- See every tag, its colour, and how many courses currently use it.
- Click a tag to rename, recolour, or delete it.
- Merge two tags - pick the source tag, pick the destination, and Aimee re-tags every course that used the source onto the destination, then deletes the source. Useful for cleaning up duplicates such as "Onboarding" and "On-boarding".
- Create a new tag from the + New Tag button.
Tags are required to publish
Every course needs at least one tag before it can be published - see Courses → Publishing. Trainers can manage the tag list from this tab even though every other workspace setting is admin-only.
Related
- Roles Overview - what each role can do
- Security & Permissions - permission model
- Billing & Subscriptions - plans, usage, invoices
- Workspace Owner guide - full owner workflow
- Your Notifications - how announcements appear to the people receiving them
- Notifications & Integrations - full notifications walkthrough